Back to Woodworking Projects, Chairmaking
Build Log: Irish Stick Chair

Summary
- Cost: ~$50-80
- Time: ~18 hr
- Completed:
- 2022-07-02 - rough assembly
- 2022-07-05 - complete less finish
- 2022-07-13 - finish
Design
This is the first chair I've build, so I went with a simple design. It is patterned off the "Simple Irish-y Armchair" by Christopher Schwarz from The Stick Chair Book.
I built this before reading The Stick Chair Book so that I'll have some practical knowledge to throw the theory up against. I learned what I needed to know to build this chair from various resources on the Lost Art Press Blog:
- Patterned off the "Simple Irish-y Armchair" by Christopher Schwarz from The Stick Chair Book
- Irish Chair No. 2: Simple, but Better – Lost Art Press
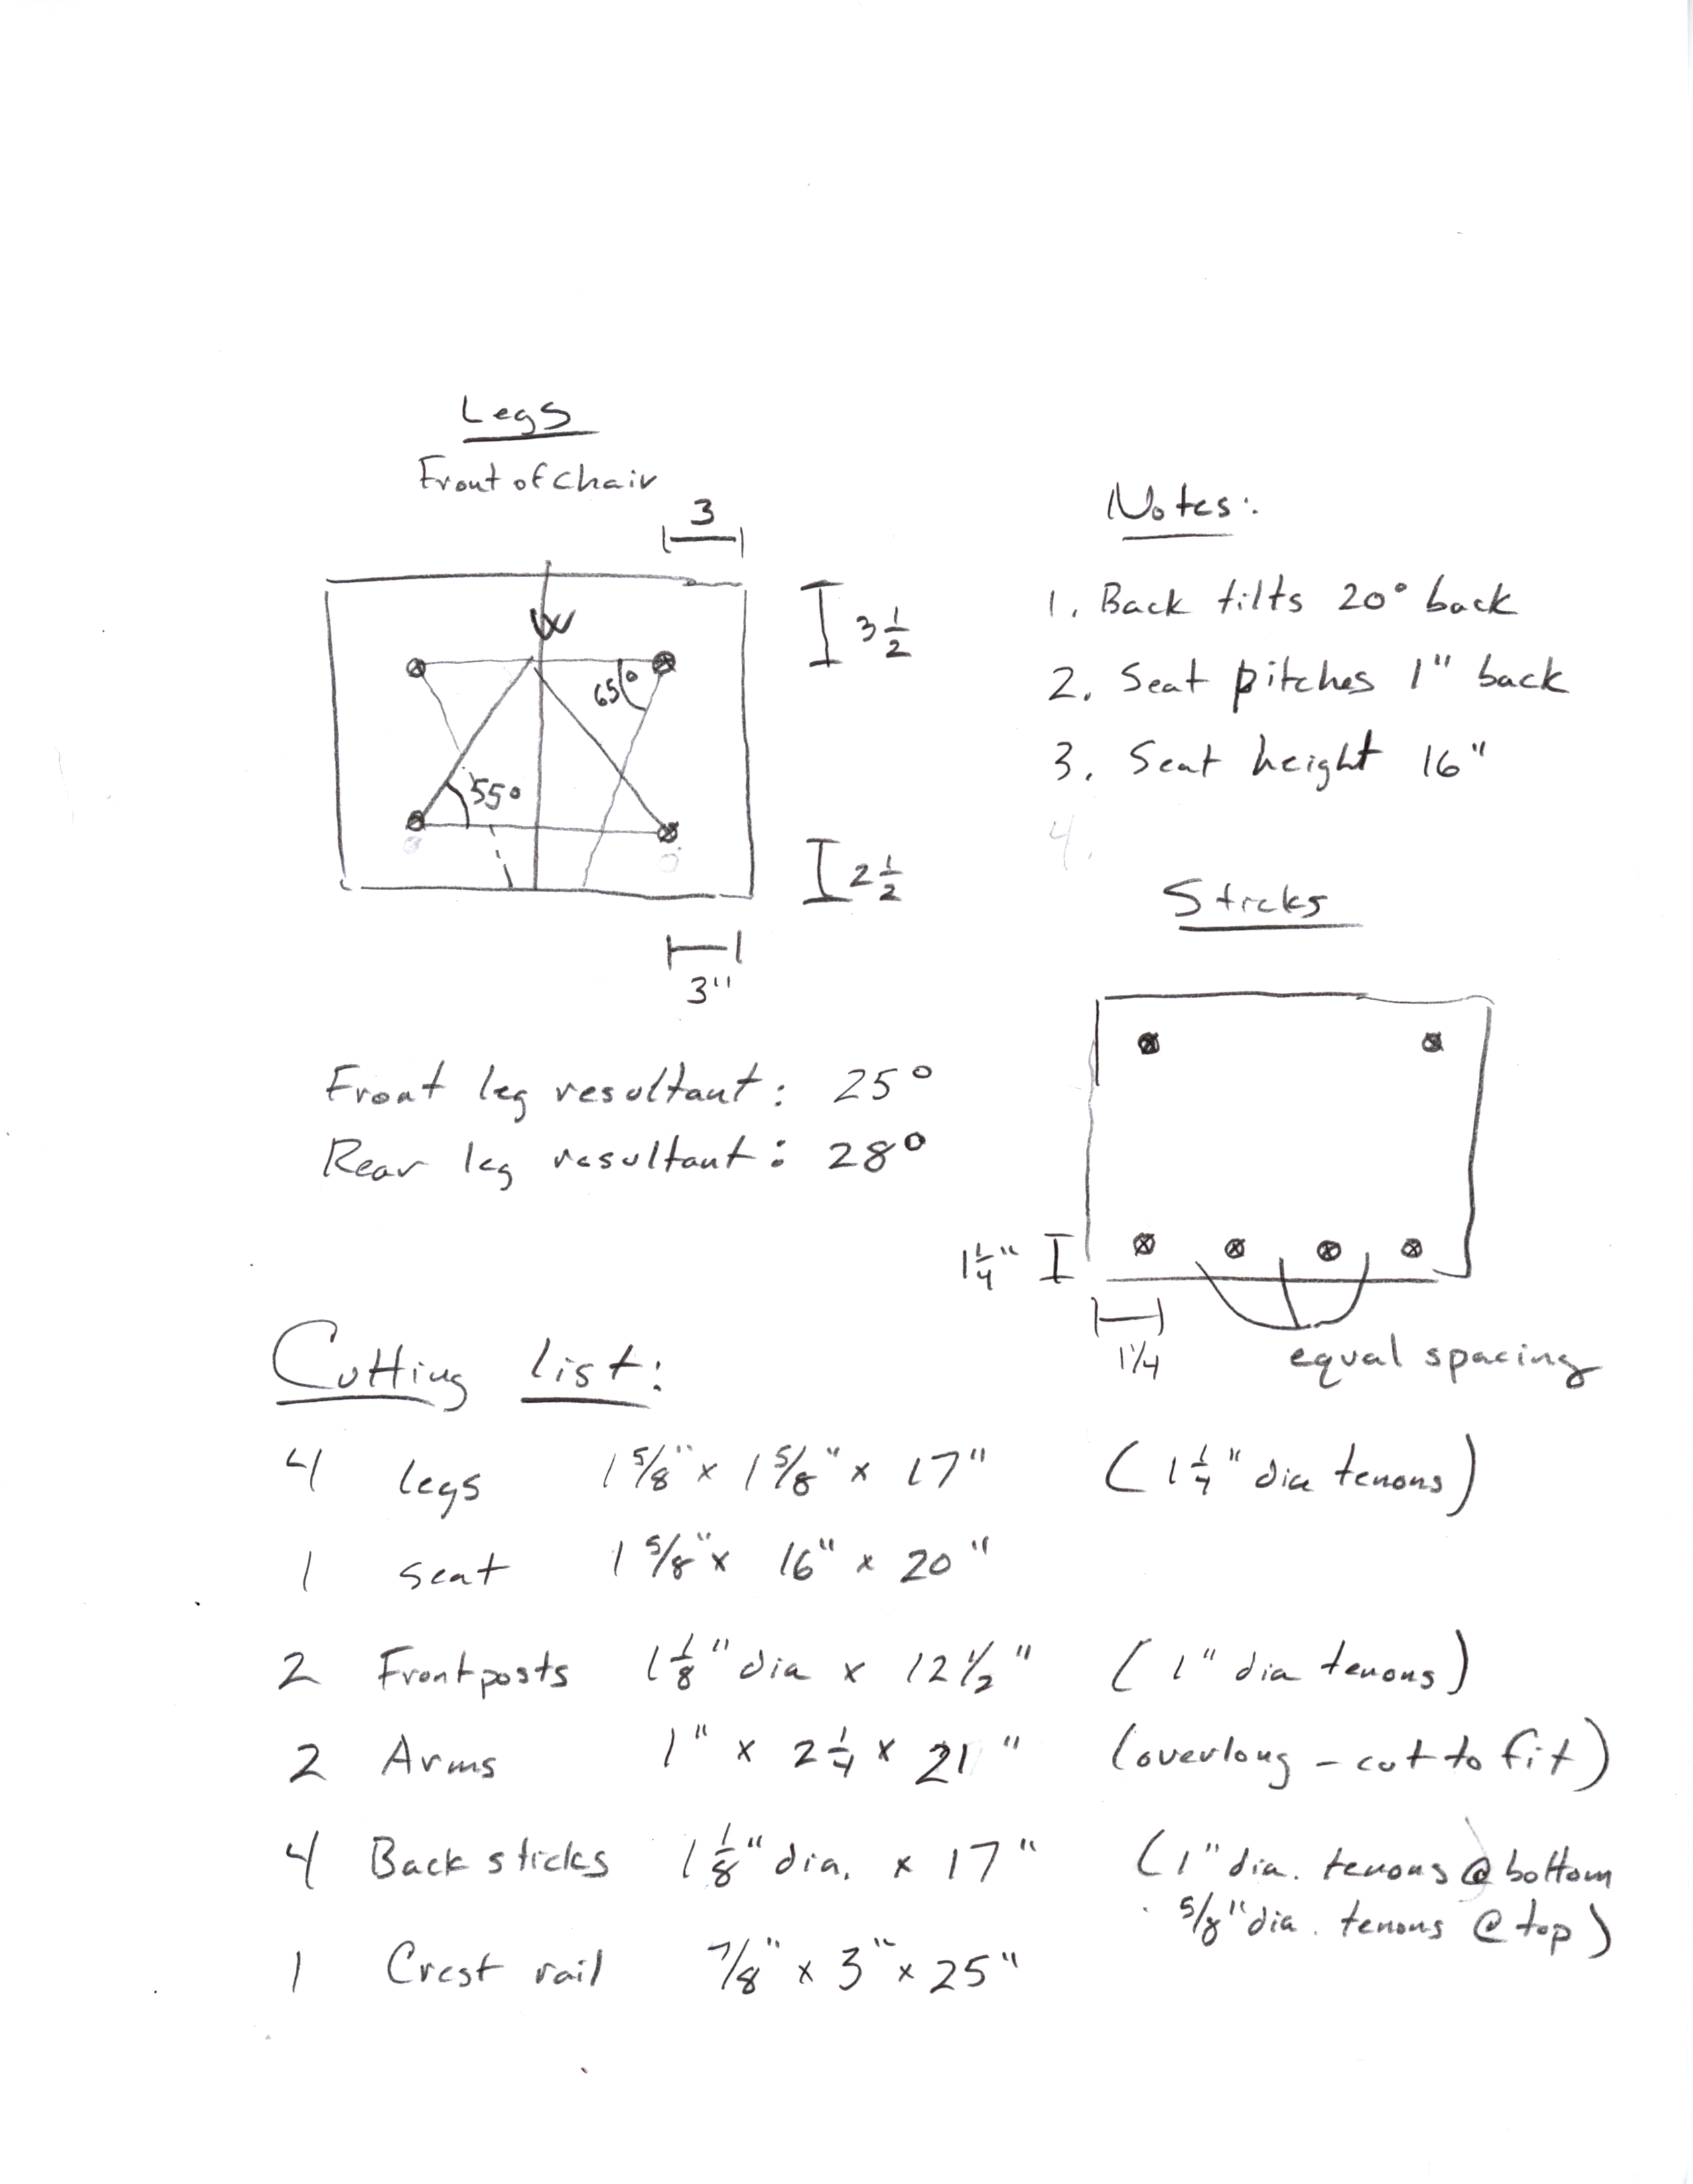
- Irish-Chair-stats.jpg (has angles and cut list: this was my primary shop reference while building and the only change I would make is to cut the legs longer)
- Compare with the Curved-back Irish-American armchair:
- Full-Size Patterns from The Stick Chair Book: Link

This Irish-inspired stick chair is built specifically for reading and relaxing. With a back that is pitched at 28°, a seat that tilts back at 4° and the sweeping curved backrest, this is one of the most comfortable wooden chairs I make.
The seat is 16” off the floor, which is 2” lower than a chair for keyboarding, though I don’t find the chair difficult to get out of. The overall height of the chair is 31”.
–For Sale: Irish(ish) Stick Chair in European Oak – Lost Art Press
Materials Required
| Material | Quantity | Description |
|---|---|---|
| Walnut | ~15 board-feet | ~$20–50, used walnut I had on hand, one 7'x6" 8/4 board and a couple of 6'x7" 4/4 boards |
| Hide Glue | 1 bottle | $10, Titebond Liquid Hide Glue, 8-Ounces #5013 |
| Finish | 1 pint (tiny amount) | $25, Tried & True Original Wood Finish |
I probably paid a total of $20–50 for the wood used when I bought a number of scraps from a millworks and cabinet shop. This would have been more like $100–200 if I had bought it by itself new.
Tools Used
- Miter saw
- Table saw
- Band saw
- Jack plane
- Block plane
- Scrub plane (first use)
- Handheld drill
- Mill / drill press
- New chairmaking tools:
Build Notes
Time Log
- 2022-06-29-Wed ~1-2 hr design ideas and tool research
- 2022-06-29-Wed ~1 hr dimensions
- 2022-06-29-Wed ~1 hr cut and glue up seat
- 2022-06-30-Thu ~1 hr scrub plane seat
- 2022-06-30-Thu ~1 hr cut sticks, legs, arms, back; plane sticks; glue legs
- 2022-07-01-Fri ~1 hr octagonalize and taper legs, trim seat
- 2022-07-02-Sat - ~2 hrs cut tenons
- 2022-07-02-Sat - ~1 hr to layout and drill holes in seat
- 2022-07-02-Sat - ~2 hrs cut and drill arms, plane, rough assemble chair for first time
- 2022-07-03-Sun - ~1 hr: cut wedges (like this), glue legs, trim/plane sticks
- 2022-07-03-Sun - ~1 hr level and cut legs, finish plane seat, attempt to install and break backrest
- 2022-07-04-Mon - 1 hr plug hole in backrest doubler and glue up, make stick wedges
- 2022-07-04-Mon - 30 min final glue up
- 2022-07-05-Tue - 30 min trim and chisel armrest tenons
- 2022-07-09-Sat - 1 hr install pins, hand sand
- 2022-07-13-Wed - 1 hr finish
- 2022-08-06-Sat - 30 min glue front post
- 2022-09-14-Wed - 30 min add coat of finish
Process Notes
- Seat
- Cut boards (8/4)
- Joint edges
- Cut biscuits
- Glue up
- Scrub plane to clean up joints
- Clean up / chamfer edges
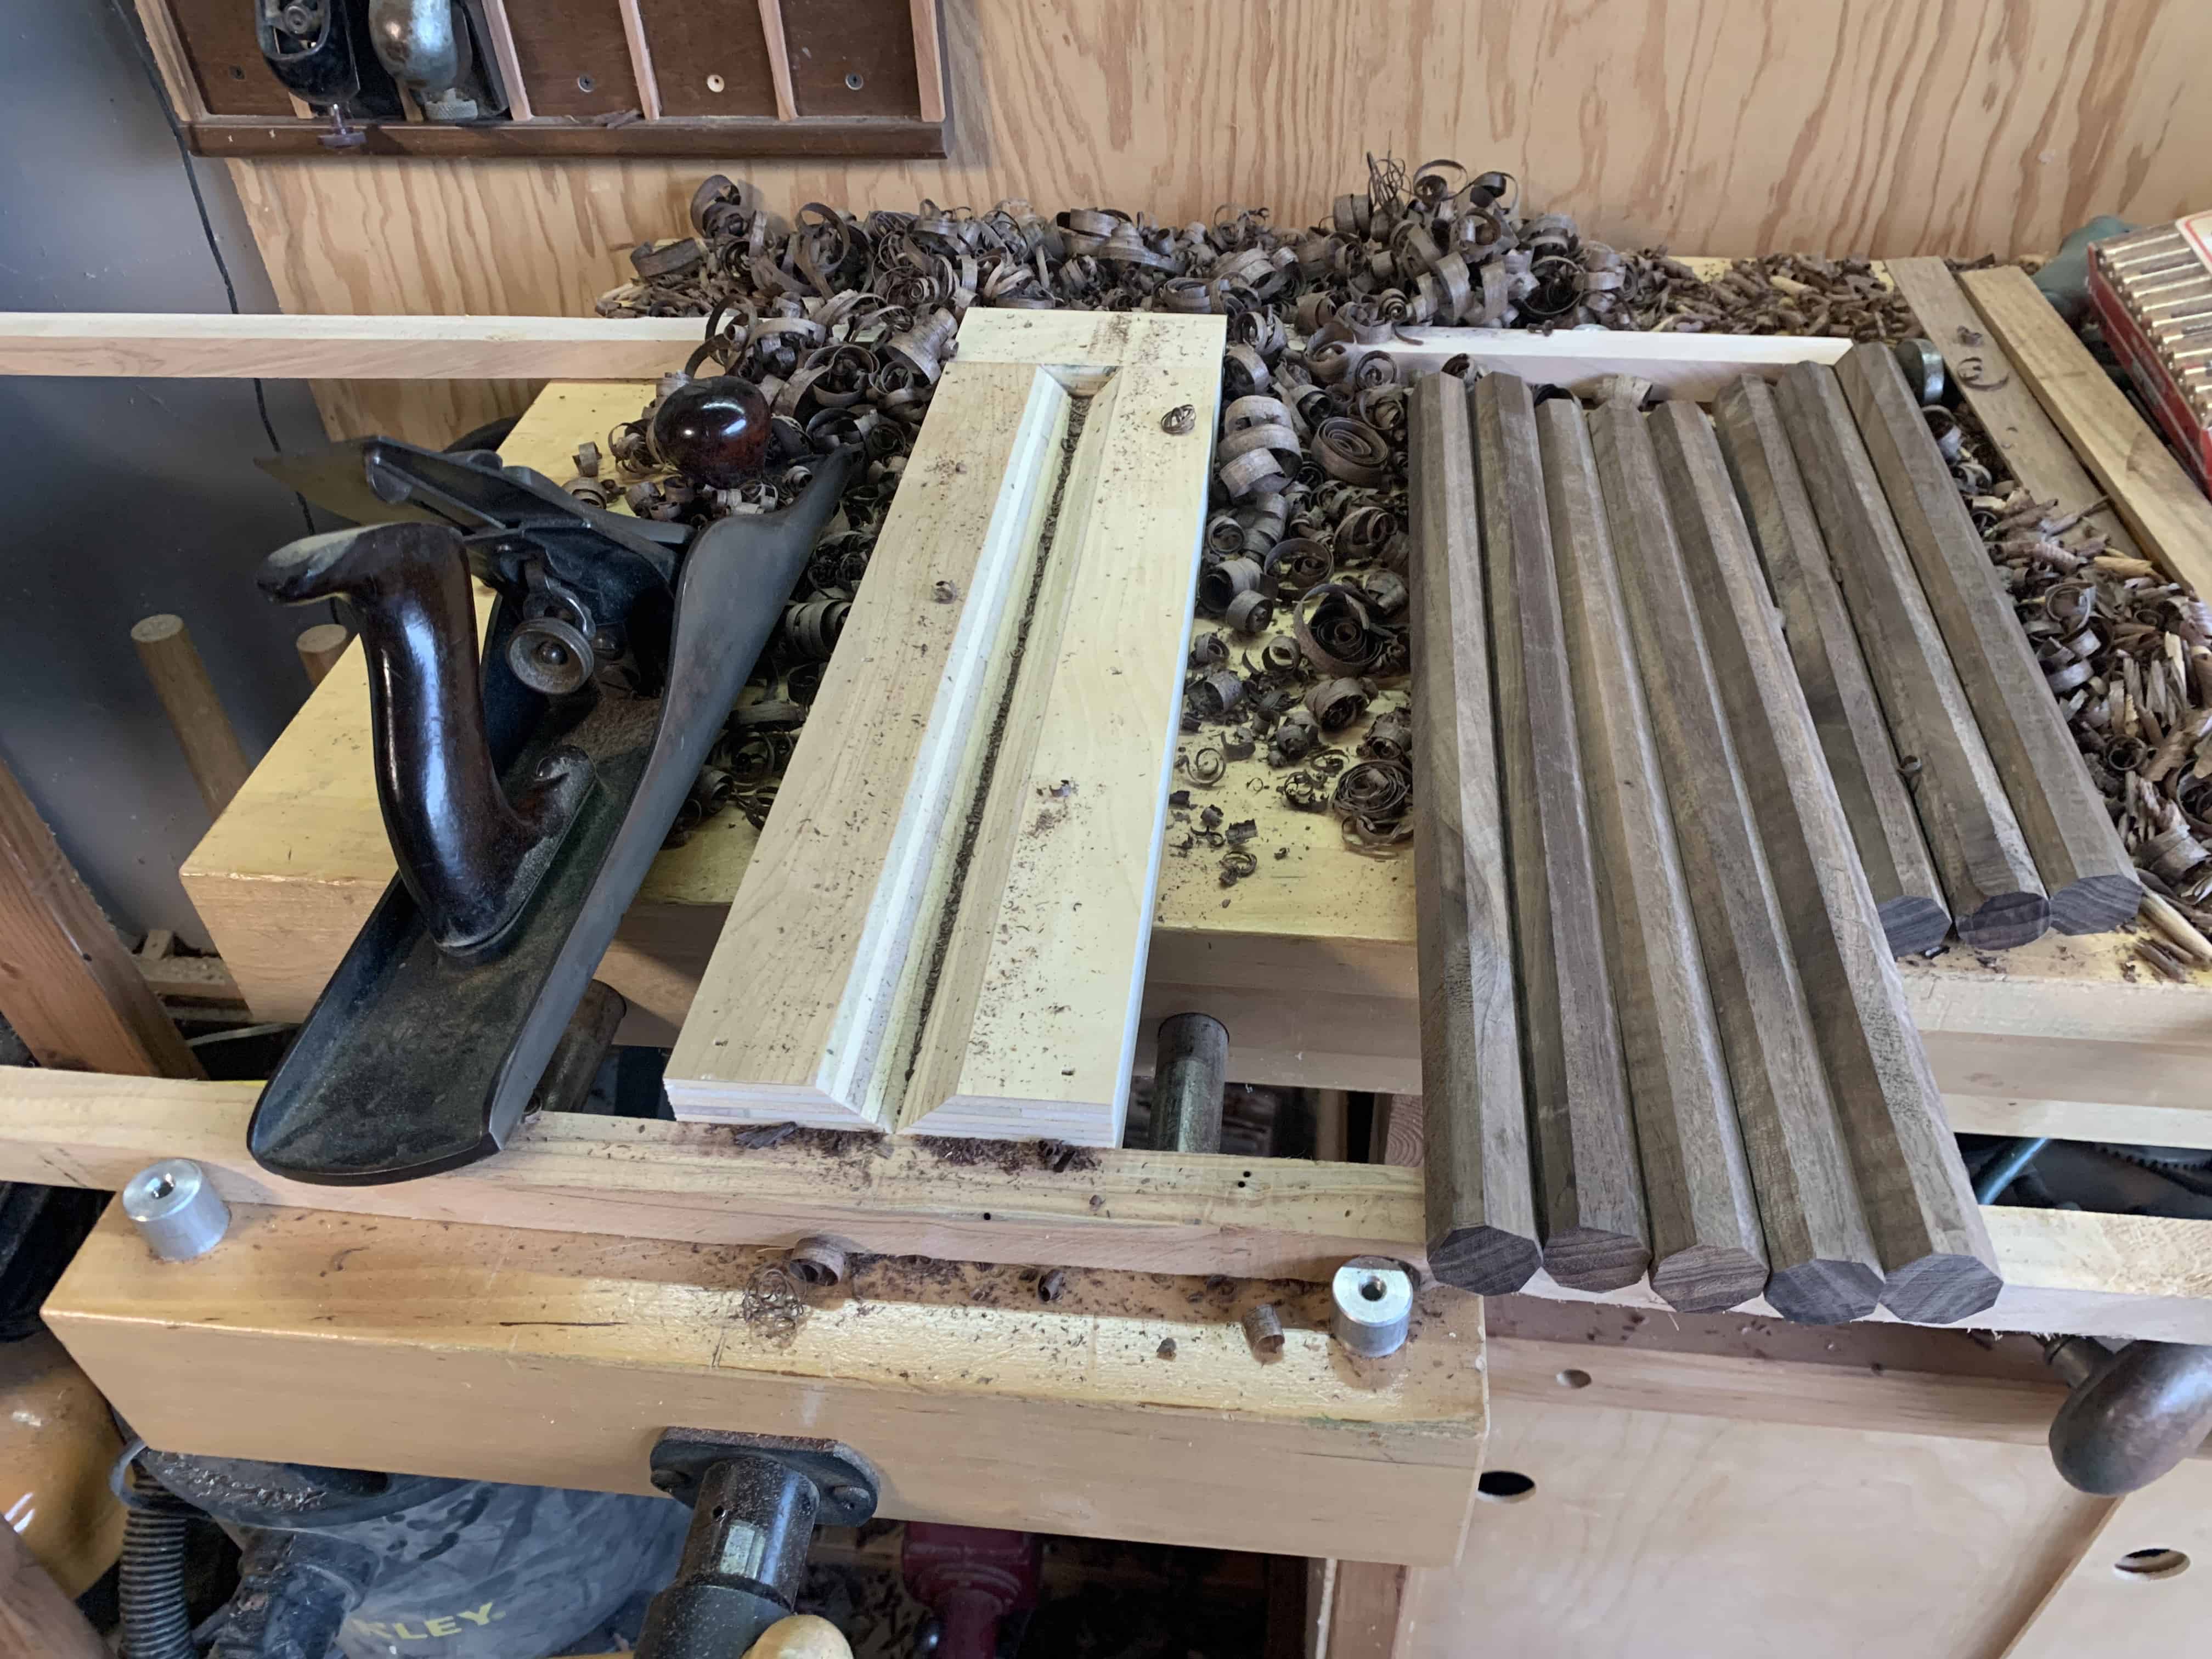
- Sticks
- cut square sticks on table saw (4/4)
- build octagonal planing jig
- plane to octagons with jig and with jack plane
- taper ends with belt sander to start tenon cutter
- cut tenons
- drawknife to blend shaft down to tenons
- clean up edges with jack plane
- cut wedge kerf on bandsaw
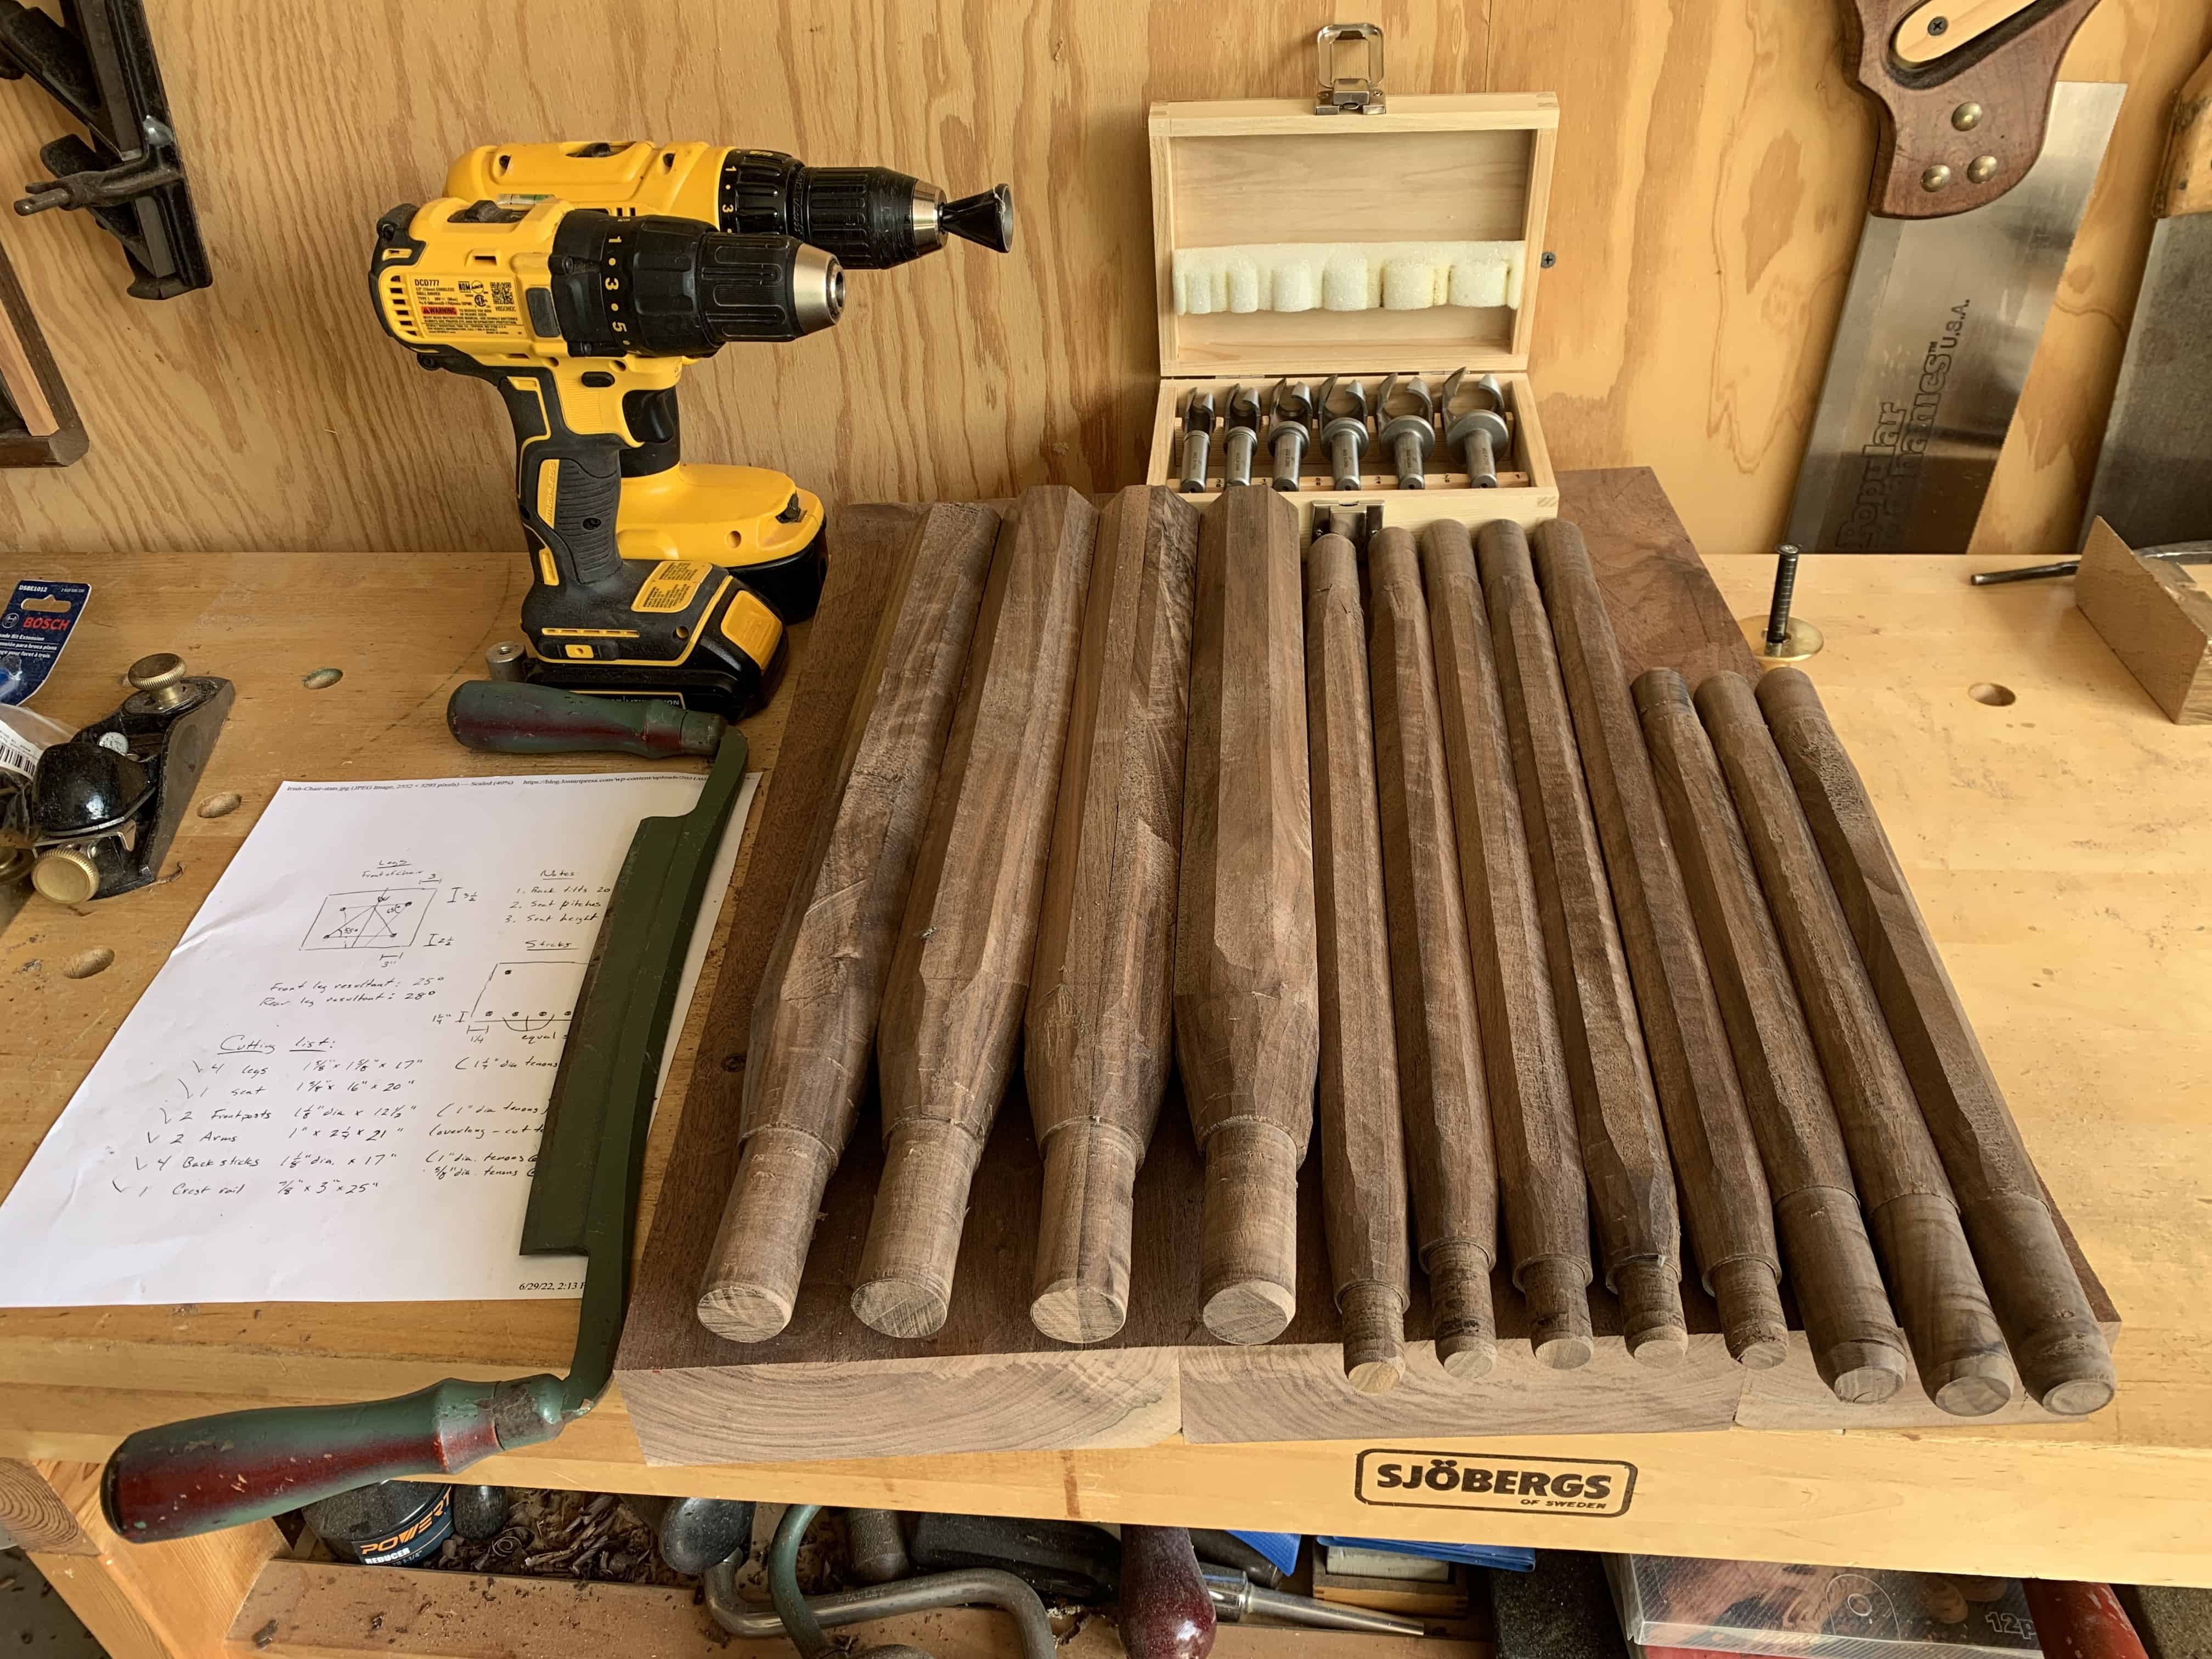
- Legs
- cut pieces (4/4)
- glue up two pieces into leg blank
- make table saw octagonal jig
- cut to octagons on table saw
- taper ends with drawknife
- cut tenons
- cut wedge kerf on bandsaw
- Drill holes
- Layout hole pattern and sightlines on seat
- Set bevel to 20º for backrest and drill three middle holes
- Rough install backrest and use hole locations to drill angles for outboard sticks (should have used a template for this, as it resulted in the wrong angle and the need for a backrest doubler)
- Drill leg holes (I drilled 3 of 4 the opposite direction, so had to re-drill the other way and go back and plug them)
- Armrests
- cut and plane
- build ~9" high rectangle clamping jig to hold arms
- with armrests clamped, drill through armrest and then through seat using drill extension
- plane down sticks to accept armrest hole
- Backrest
- Cut, plane, drill three middle holes on mill (damaged the first one which became the back doubler)
- Mark angles and drill outside holes freehand (resulted in one blow-out from not centered, should clamp a block on either side)
- Trim down damaged piece, plug hole, and glue up with main backrest
- Assembly
- Make wedges on band saw, trim to width as needed
- Glue up legs and install wedges
- Level legs on kitchen island and cut to length
- Bevel end of legs (feet?)
- Flush cut tenons and wedges on top side of seat
- Final plane seat with scrub plane (surfaces) and Jack plane (chamfers)
- Glue up sticks, armrests, backrest; install wedges
- Flush cut wedges on back underside
- Cut armrest wedges/tenons proud; clean up with chisel
- Hand sand with a 380 grid disc pad
- Finish with Tried & True Original Traditionnel applied with an old t-shirt
- On 2022-08-06-Sat I realized that the right (when seated) front post was not glued into the seat! I was able to back it out most of the way, get some glue in there, tap it back in, and clamp it down.
Joining the seat:

Octagonalizing the sticks:
Prepping for tenons:

Cutting tenons:
Oops!

Laying out the arms:

Leveling:

Back doubler with plug:

This earned me my ‘Stick Chair Merit Badge’:

Created: 2022-06-29-Wed
Updated: 2026-01-06-Tue